Monday, March 21, 2016

Easter Craft

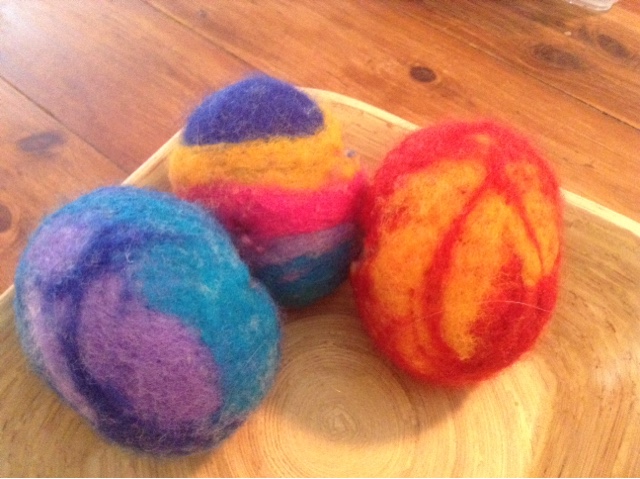
Felted Wool Easter Eggs


That are hollow inside, so they can be homes to little sewn wool felt chicks.

The insides of the eggs are a bit messy - think I made them too thick, and my wet felting technique seems to need improving.  Luckily the eggs are mostly inhabited by the little chickies though, so you don't see the insides.


Monday, February 8, 2016

What might vegan or vegetarian families eat for dinner?

Our warm weather meal plan - this often has changes, and is lacking in detail a bit, but it gives an idea of what we eat.

I try to use meal sequences to save work, so for example, week 1 has lentil sloppy joes which are cooked in the slow cooker.  Some lentils are saved for serving with Saturday's roast veg (like a gravy) - that meal will just be a big plate of roast veggies with savoury lentils spooned on where its wanted.  Some of the roast veg (usually orange veg) are frozen for dinner on Tuesday, and the rest are used for bubble n squeak as an easy Sunday night dinner.  Monday of week two is salad plate - which really just means anything cold, and I'll make something like coleslaw as part of it.  Then Tuesday is bean burgers, which use the veg from the freezer from Saturday, mixed with some beans (like butter beans, but any sort really) and breadcrumbs made from stale bread.  These burgers are fried and served with rolls or Turkish bread along with the leftover salad from Monday night.

Gado gado would really be best before salad plate or a barbeque, as I use part of a cabbage (and the other part is good for coleslaw), I cook cubed potatoes (and make extra for potato salad), and we have cold boiled eggs (I can do extras for stuffed eggs to have with salad).  By the way, we are almost vegan, with the exceptions being that we do sometimes have eggs, but I don't tend to "waste" them by using them where they wont be noticed, so if we do have eggs it will be for something like egg on toast and not as an ingredient for cakes or pancakes.  The kids also add cheese to things, but I don't generally cook with cheese - they can just add it if they want.

Wednesday, December 2, 2015

Cockatoos right at our kitchen door

Our garbage bin was overfull this week after a big tidy and then visitors.  A lovely pair of cockatoos decided to help themselves.


Tuesday, December 1, 2015

Homemade Christmas Tree

The tree is up.  We will make some more decorations for it as December goes on.


Thursday, November 26, 2015

Other Types of DIY Jesse Trees

There are so many ideas for making your own Jesse Tree online - lots of versions of felt ornaments along with collections of different items for ornaments.  But if you want something quite quick and easy, there are also printable ornaments.

You can print off sheets with all the ornaments either in colour or for the kids to colour in.  These can be glued onto a picture of a tree or onto small pieces of card with a string attached for hanging to a tree.  Here is the link to one version Printable Jesse Tree Ornaments

This is a nice idea.  Print off small pictures to represent the Jesse Tree readings, and glue them to flat glass "marbles".  Add magnets to the back and you have a set of magnetic Jesse Tree decorations.  Instructions and printable for this can be downloaded here.

Jesse Tree

We love having our Jesse Tree each year.  There are lots of people who have posted in blogs how they have done their Jesse Trees, including many who have pictures that you can download and colour to use for the decorations, so don't think you're too late to do one.  You can also make the decorations as you go if you want to make your own.

I started writing about our Jesse Tree last year, and its almost Christmas again, so I'm going to try again to get it posted.  I'll start from the beginning so you don't have to click to the previous post to get to the start.

If you want to see my tiny intro blurb explaining what a Jesse Tree is, you can see the earlier Post:   Earlier Jesse Tree post

We made a wooden "tree" with dowelling - drilled holes and just pushed thinner dowelling rods through.  A branch, a bought Christmas tree, or some other type of tree would work well too.  Last year my eldest daughter made a tree from a kit - less than a metre high out of wire that was wrapped in coloured cloth/ribbon - it is beautiful.  Something like that would work well too.

This picture is our half filled Jesse Tree.  The orange and yellow thing near the top is not part of the tree - it is hanging on the wall.  It is a fairy that I made years ago (felting wool roving) that I've left on the wall to now play the part of an angel.  Some day I'll make something more angel-like.


These are the leaves all made and ready for decorating.  I cut out a big pile of leaves from green felt, and strips of brown felt for the stalks.  Then I layered two pieces of felt with the stalk in the top as a loop, and machine sewed around the outside.  The veins were added my machine too.  The leaves were all sewn quickly and "freehand" - that is, I didn't draw the veins or anything, so they aren't all identical, and I just did each leaf without stopping and cutting the thread anywhere apart from right at the end.  It was quick and easy.

The first year we did Jesse Tree, I was not prepared before December.  I did most of these at the start of December, and then added decorations a day or two at a time, as we went.  We didn't end up with one for every day - every year we miss a few days.  It works fine for us.  I still have a few blank leaves left (five years later) and might some day put something on them.

The pictures to represent each Bible reading were cut from felt and from iron on applique backing - I just ironed them on and didn't sew them at all.  We've used them for quite a few years now and they are still holding strongly.

So, here are the pictures of the leaves, along with the Bible passages.  We read one a day.  If we miss a day we sometimes do a couple on the weekend.

DAY 1:  Put up the empty tree.  Read Isaiah 11:1-10.  Talk about how the readings start at the beginning of the Bible (creation) and show us the pathway to the birth of Jesus, and how God kept bringing His people back to him.

DAY 2:  Genesis 1:1-2:3  Creation of the World


DAY 3:  Genesis 2:4-24 Creation of People


DAY 4:  Genesis 3:1-24


DAY 5:  Genesis 6:5 - 9:17 Noah and the Flood - This is a big passage, and you could break it into a couple of parts of leave bits out.  We do usually read the whole lot and then leave out other bedtime reading that day.  It would be easy to just read parts though.


DAY 6:  Genesis 12:1-9, 15:1-6  Abraham - You could just read the chapter 12 section.


DAY 7:  Genesis 28:10-22  Jacob's dream - the ladder


DAY 8:  Genesis 37 Jacob's sons; Joseph's coat


DAY 9:  Genesis 41-42 Wheat


DAY 10:  Exodus 1-2 Baby Moses


DAY 11:  Exodus 2:23-25, 3 The Burning bush


Extra passages that would be good to include in here are the Plagues in Egypt (Exodus 5 and onwards) and the Exodus from Egypt including the parting of the Red Sea (Exodus 13 and onwards)

DAY 12:  Exodus 19-20 (or you could use Deuteronomy 5:1-22  Giving of the Ten Commandments


DAY 13:  1 Samuel 3 The story of Samuel


DAY 14:  1 Samuel 16:1-13  God chooses David


DAY 15:  1 Samuel 17  David and Goliath


DAY 16:  1 Kings 3:4-28  Solomon


DAY 17:  1 Kings 18:17-39 Elias


DAY 18:  Jonah (Yes, we have generally read the whole book of Jonah.  I can clearly remember this reading from the first time we did the Jesse Tree.  Perhaps the kids had never heard the whole story read.  We were sitting outside after dinner reading it, and I only planned on reading a little, but they were all engrossed in the story and kept saying "Read more, read more", so we just read the whole thing.  You can certainly just pick out parts of the story though.)


DAY 19:  Luke 1:5-25  Zacharias and Elizabeth - This is a picture of the censer - the thing that Zacharias took into the temple - if I remember correctly!


It would be good to have a reading about John the Baptist here.  We've always been too close to Christmas day when we get this far though!

DAY 20:  Luke 1:26-56  The Angel comes to Mary


DAY 21:  Luke 2:1-6  Travelling to Bethlehem - or you can chose whatever part of the story of Jesus' birth that you like


DAY 22:  Luke 2:2-20  The birth of Jesus


There are so many other parts of the story of birth of Jesus that could be included.  We read other parts of the story when we light candles - that is in another post!

Friday, May 22, 2015

Chocolate Cashew "Uncheese Cake" Slice

My kids call this "fudge slice" when it is straight from the refrigerator because it is quite firm, but as it comes to room temperature it becomes softer, more like a cheese cake.  It has a nice, cashew flavour.  It is not a healthy slice - it is treat food.  But it is gluten-free, vegan treat food, so useful for all sorts of diets and allergies.  There is cane sugar and margarine in the glaze (icing) so you could just leave that off if necessary


Before I give you the recipe, just a quick note about the equipment used.  I used my Vitamix blender for the cashew filling (the main part of the slice).  I started it in a food processor (because I had that out for another recipe, and I used that for the base) but that didn't work.  The cashews were still gritty, and I wanted it to be completely smooth like a cheesecake.  It worked quickly and easily in the Vitamix.  If you don't have a Vitamix, I would suggest soaking the cashews overnight and then draining them well.  I haven't tried this yet though, and will edit this post once I get a chance.

The slice has three layers.  You could leave the top layer off, but it neatens it up.  Each layer is very quick but after the filling (the second layer) you do need to give it time to set in the freezer.  You could even just put it in the freezer overnight and add the glaze (the top layer) in the morning - this sets almost instantly.

Chocolate Cashew "Uncheese Cake" Slice

There are three layers on this slice.  You could leave the top layer off if you really wanted to.

Prepare a slice tin by lining it with parchment paper.

BASE:

1 1/2 cups almond meal
1/3 cup raw cacao powder
4 1/2 (90 ml) tablespoons maple syrup
1 1/2 teaspoons vanilla extract

Combine all of the ingredients in a food processor or pulse them in a blender - you don't want to end up with nut butter!  Just mix enough to end up with something that looks like cheesecake biscuit base. Spoon this into your lined slice tray and press it down as evenly as you can.  Set aside.

FILLING:

2 1/2 cups raw cashews
1/2 cup melted coconut oil
1/2 cup maple syrup
1/2 cup raw cacao powder
3 medjool dates (remove the seeds)
1/2 cup water

In a Vitamix (or other high powered blender - see note above) blend together all the ingredients until the mixture is completely smooth and you can't tell from the texture that there are nuts in there.  Scrape this on top of the base in the slice tray and smooth it out.  Put it into the freezer until it is solid (about 2 hours).

It is easiest to remove the slice from the tray before adding the glaze as you wont spoil the look of the top (even if you have to turn it upside down) because it is frozen.  The glaze is easy to add out of the tray.  So, once the slice is frozen, remove it from the tray and set it aside while you make the glaze.

GLAZE:

This is my standard smooth chocolate glaze for cakes.

1/2 cup sugar (I use raw organic sugar)
3 tablespoons (about 60 grams) margarine
1 1/2 tablespoons (30 ml) non-dairy milk
2 tablespoons raw cacao powder (sifted)
2 teaspoons vanilla extract

Combine all of the ingredients except the vanilla in a saucepan.  Put over heat and stir with a wooden spoon - bring it to the boil.  Keep stirring while the glaze simmers for 2 minutes.  Remove from the heat and stir continuously for 5 minutes.  Stir in the vanilla.

Working quickly, pour this over your slice and spread it.  Because the slice is so cold from the freezer the icing will set very fast - perhaps before you have it spread neatly (it goes smoothly onto room temperature cake).  You can have some boiling water ready in a glass to dip your spatula in to help with spreading if necessary.

CUT THE SLICE into squares and serve.